Saturday, April 14, 2012

Surf's Up!

            One of my favorite themes to recreate on a cake is the beach. Being one of the first cakes I’ve ever made, I was excited when my friend Morgan asked me to make her boyfriend’s cake with a beach theme.
            Shawn, who is a lifeguard in Long Beach Island, loves surfing and summer. For this reason, Morgan and I set out on designing a cake that Shawn would absolutely love.

            French vanilla cake with a rainbow chip filling, the cake was covered in buttercream frosting and cerulean blue frosting. To create the sandy effect, graham cracker crumbs were secured onto half of the cake using a thin layer of white frosting. The other half was covered with a blue and white swirled frosting, applied using Wilton star tip 21 to create the wavy effect.
            The lifeguard chair, due to limited time constraints, was constructed using miniature wooden picket fences purchased from Michaels, which were then painted white and hot glued together to form a chair. The driftwood plank that hangs on the front was painted the decorated in the same manner.
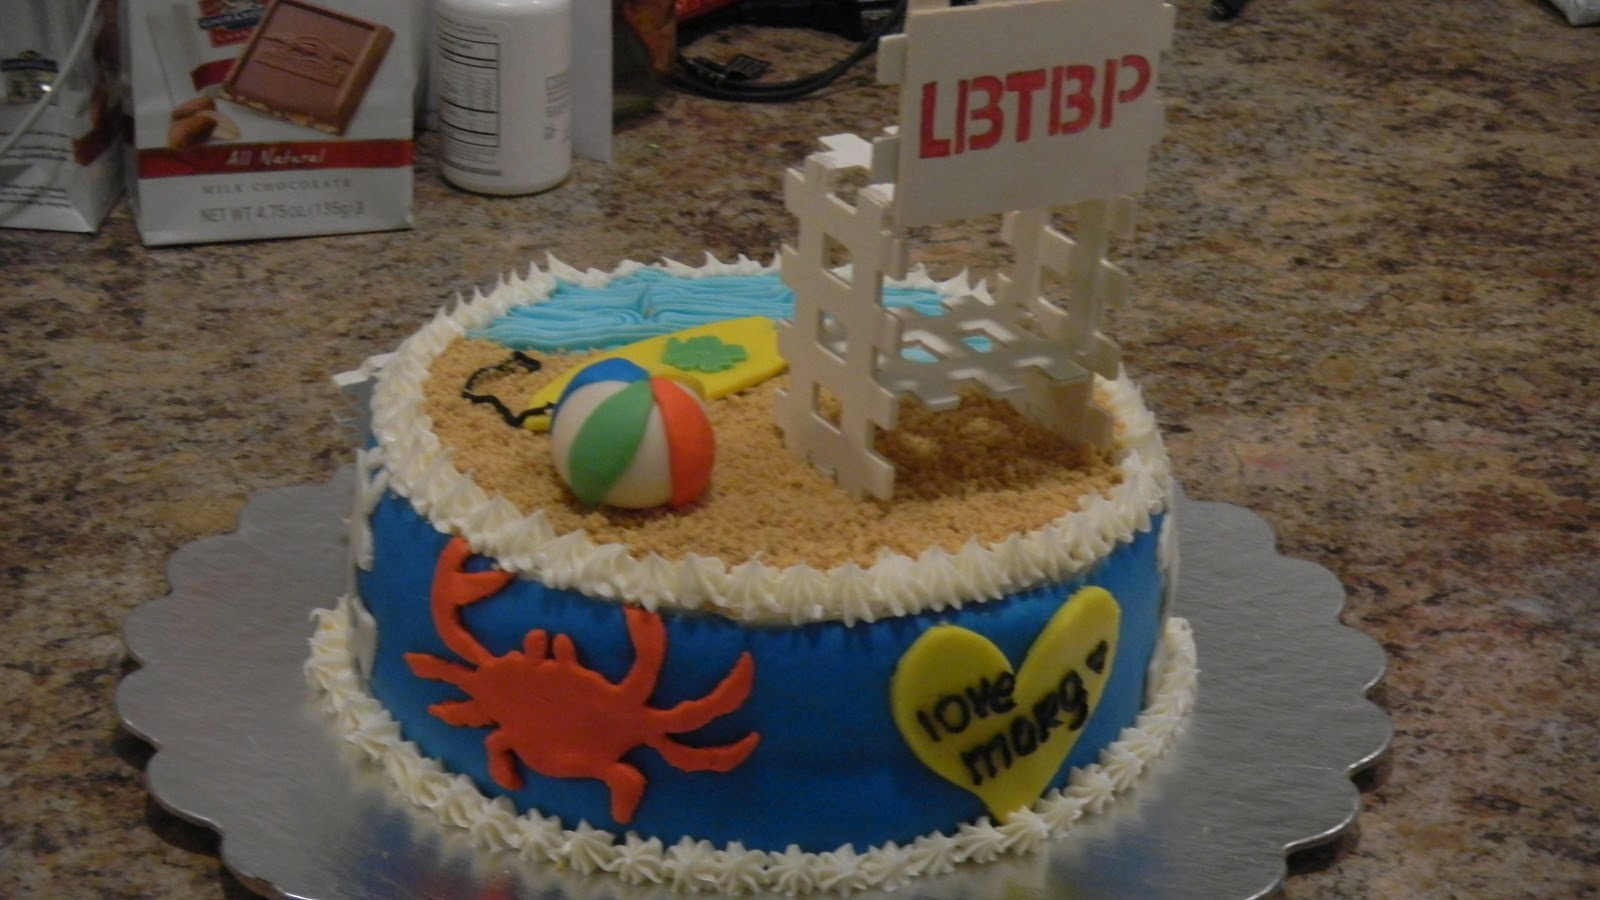
            White anchors and blood orange crabs were cut from colored fondant and adhered to the sides of the cakes using a small amount of water.
            TIP: When working with fondant, be sure to keep the room you are working in at a cool temperature. When exposed to too warm temperatures (especially when put in the microwave to soften), fondant becomes too soft and sticky, making it extremely difficult to work with. When working with the crabs, due to the amount of food coloring used combined with the temperatures of the microwave, it took many attempts until a crab did not fall apart upon cutting.
            A yellow surfboard and beach ball were formed out of fondant and secured on the cake using toothpicks that were hidden inside the cake. It was then lined with white frosting using star tip 21 to create a clean border.

            This cake, surprisingly, was quick to make, only taking approximately three hours. It was fast and fun and a huge hit for the birthday boy. With the hot summer months quickly approaching, anyone would love a beach themed cake for their birthday.

Wednesday, April 11, 2012

Countdown to Graduation!

            With both college and high school graduations right around the corner, graduates and their families are sure to be scrambling around trying to plan the perfect party to celebrate. Nowadays, specialty cakes are known to be the centerpiece and greatest hit of the party, commonly assembled in the form of a pile of books or decorated with symbols of the person-of-honor’s future plans. Today, I just wanted to share a few cakes I’ve made to commemorate a few people’s special days.
            First, as shown below, I constructed a cake for my sister, Lauren’s, college graduation. After graduating from Montclair State University in spring of 2011 with a degree in Latin and the Classics, I thought it highly fitting to build the Roman Coliseum out of her favorite cake. 
            Yellow cake with chocolate frosting, the 14 inch-round cake consisted of three layers, held together with buttercream frosting and Duff’s fondant dyed beige. After lining the sides with windows and archways of a Romanesque nature, I piped mocha frosting around the edges as a border and molded three small trees from green fondant to stand at the front of the Coliseum. I then proceeded to write “Congratulations Lauren!” with a graduation cap with a black icing tube and small tip attachment.
            Next was a hot pink graduation cake for my ex-boyfriend’s cousin, Christa, who was leaving behind high school in pursuit of a culinary career at the Culinary Institute of America. The red velvet square cake, adorned with a chocolate graduation cap and starts, was made alongside fifty red velvet and chocolate cupcakes topped with mini fondant graduation hats and paper diplomas.
            These cakes made both Lauren and Christa’s day that much better, a special treat to celebrate hard work and a promising, successful future.

Sunday, April 8, 2012

Happy Easter, Chicklets!

            Happy Easter, little baking bunnies! Before I hop on over to Charlie Brown’s Steakhouse to spend my Easter Sunday on the job, I figured I’d share my latest springtime creation with you.
            First of all, I am absolutely convinced that I am scheduled to work a majority of the holidays at my restaurant is because I never fail to make a new flavored cupcake for my co-workers to try in honor of each special day. For this Easter, I decided to make Creamy Lemonade cupcakes, adorned with paper bunnies and eggs to make them more festive.

            I have been swamped with papers and projects, especially my senior thesis that is due this week. Because of this, I didn’t have much time to make these cupcakes elaborate and complicated. So I decided to stick with a simple look that still manages to be fun and appealing to the eye and the taste buds. These cupcakes are quick and easy, taking less than an hour to bake and decorate. The cake is a tangy, yet refreshing lemonade flavor, both topped and stuffed with vanilla frosting.

Creamy Lemonade Cupcakes (yields 24):
1 Box White Cake Mix (Recommended Product: Betty Crocker SuperMoist white cake mix)
1 ¼ cups water
1/3 cup vegetable oil
3 eggs
½ cup sweetened lemonade drink mix (for extra tang, use ¾ cup)

Combine all ingredients in large bowl and mix on high for two minutes or until batter is smooth. Divide batter evenly among cake wrappers. Proceed to bake for 20 minutes or under edges are golden, then let sit until cool. Using a Wilton filler tip, inject vanilla frosting into centers of cupcakes with either an icing bag or gun. Cover cupcakes with vanilla icing using Wilton tip 1M and top with sprinkles/decorations of your choice. I myself purchased a cupcake decorating set from Michaels ($1.99) due to time constraints. Be sure to refrigerate cupcakes if not serving immediately.

These cupcakes are a fast and fabulous treat for Easter, with just the right combination of springtime flavor and flair. Whether for your friends, family or, like me, a work affair, these creamy lemonade cupcakes are sure to brighten up any table this Easter.

Saturday, March 17, 2012

The Luck of the Irish

            St. Patrick’s Day is infamously known for being the biggest drinking holiday of the year. Even if you aren’t Irish, it is customary to be decked out in green and chug a good amount of green beer from the moment you wake up until the moment you pass out.
            As I’ve said before, I love to bake for my co-workers at the steakhouse I work at. This year, unfortunately, I had the luck to be scheduled on St. Patrick’s Day, so no green festivities for me. However, I stumbled upon a recipe for Shamrock Shake Cupcakes one day at my internship.
            For those who don’t know, Shamrock Shakes are green milkshakes, made famous primarily by McDonald’s during the month of March, that have a refreshing mint and vanilla flavor. Instantaneously, I decided to make these cupcakes for my co-workers that were in the same boat I was.
Shamrock Milkshake Cupcakes (yields 22 cupcakes)
Ingredients
4 egg whites
2 cups all-purpose flour
1 teaspoon baking powder
½ teaspoon baking soda
½ teaspoon salt
1 cup buttermilk or sour milk
¼ cup green crème de menthe
½ cup shortening
1 ¾ cups sugar
1 teaspoon vanilla
1 recipe White Chocolate Frosting
            Green food coloring
Directions
1. Allow egg whites to stand at room temperature for 30 minutes. Meanwhile, line twenty to twenty-two 2-1/2-inch muffin cups with paper bake cups. In a medium bowl stir together flour, baking powder, baking soda, and salt. In a 2-cup glass measuring cup combine the buttermilk and the creme de menthe. Set aside.
2. Preheat oven to 350 degrees F. In a large mixing bowl beat shortening with an electric mixer on medium to high speed for 30 seconds. Gradually add sugar, about 1/4 cup at a time, beating on medium speed until light and fluffy. Beat in vanilla. Add egg whites, one at a time, beating well after each addition. Alternately add flour mixture and buttermilk mixture to shortening mixture, beating on low speed after each addition just until mixture is combined.
3. Spoon batter into prepared muffin cups, filling each about two-thirds full. Use the back of a spoon to smooth out batter in cups.
4. Bake for 15 to 18 minutes or until tops spring back when lightly touched. Cool cupcakes in muffin cups on wire racks for 5 minutes. Remove cupcakes from muffin cups. Cool completely on wire racks.
5. Divide White Chocolate Frosting between two bowls. Tint one portion with green food coloring. Spoon each frosting into a pastry bag fitted with a large star tip. Pipe white and green frostings onto tops of cupcakes to resemble four-leaf clovers. Makes 20 to 22 (2-1/2 inch) cupcakes.

White Chocolate Frosting (yields 3 ½ cups)
Ingredients
1 cup butter, softened
6 ounces white baking chocolate with cocoa butter, chopped
1/3 cup whipping cream
1 ½ - 2 cups powdered sugar
Directions
Place white baking chocolate in a large mixing bowl; set aside. In a small saucepan heat whipping cream just until simmering. Pour over white baking chocolate; let stand, without stirring, for 5 minutes. Stir until smooth; let stand for 15 minutes. Gradually beat butter into melted white chocolate mixture with an electric mixer on medium to high speed, beating until combined. Gradually beat in powdered sugar until frosting reaches piping or spreading consistency. Makes 3-1/2 cups.
            I have to say; these cupcakes tasted exactly like the Shamrock Shakes from McDonald’s that everyone loves so much. With just the tiniest bit of crème de menthe to add the minty flavor and green glow, it is a simple and sweet way to get into the Irish spirit.


*Recipe Compliments of Better Homes and Gardens (http://www.bhg.com/recipe/cupcakes/shamrock-milkshake-cupcakes/)

Thursday, March 15, 2012

Two-Tone Trimmed Treats


            My favorite thing about cupcakes is that they are quick and easy to make. However, unlike larger cakes, there is not much room for creative freedom. With that being said, it is important to work with the space that you are given. This morning, I figured I’d share with you my favorite technique for making cupcakes look a little bit more fun; two-tone frosting.
            As I said, cupcakes are quick and easy, and so is this decorating technique. While it may look complicated, as if it would take an hour rather than only five minutes, two-toned frosting is easily doable for even baking beginners.
            All you have to do is take two batches of white frosting, separating them evenly. Color each back a different color of your choosing. When ready to decorate, take an icing bag or icing gun and fill it halfway (vertically) up the side of the bag or gun with frosting color #1. Proceed to do the same with frosting color #2. If doing this correctly, your icing bag or gun should look as if it has been split vertically down the middle. Tie off the bag or cover the gun with the end cap and proceed to frost cupcakes with Wilton tip 1M in a swirling motion. 

             It is, honestly, as simple and easy as that. The receivers of your cupcakes are sure to love this technique and will be begging you for your secret! Two-toned cupcakes add a bit of flare to an otherwise plain and boring dessert. Don’t ever let your cupcakes be dull; with cupcakes, the possibilities are endless.

Monday, March 5, 2012

Who Lives in a Pineapple Under the Sea?


            So this month I have been pretty busy on the cake scene. I recently had an order for a 10-year old’s birthday party. What was the theme? Spongebob Squarepants. When the mother throwing the party added in this fact, I internally groaned. The thought of shaping 35 Spongebob cupcakes made my insides twist and, because I am a full-time student with two part-time jobs, I knew this would be a challenge in the sense of time management. Because of the time constraints and the complexity of the layers of Spongebob’s face (it took extreme attention to detail), I began this project two days before the due date.

            The cupcakes were simple; 17 chocolate and 18 vanilla. Baked in neon blue and green wrappers, I covered each cupcake with a thin layer of buttercream frosting before placing them in the refrigerator to allow them to harden up a bit before adding the first layer of bright yellow fondant (Recommended product: Duff 2-lb. Fondant Tub; available for purchase at nationwide retailers including Michaels and Party City for $19.99).
            Using a circular cookie cutter, I cut 35 yellow faces, placing them upon the layer of buttercream. Moving on, 35 mouths, hand-cut using simply a sharp knife and self-colored black fondant, made their way onto the blank Spongebob faces, adhering to the yellow with only a small dab of water brushed onto the backs. Next came the formation of the eyes, a very important characteristic of Spongebob’s face. With large, piercing blue eyes, the cupcakes were adorned with 70 eyes, each having three layers; white, blue and black. This took the longest of all, cutting out 70 of each color. To do so, simply use circular decorating tips, each being a different size. White, of course, would be the largest tip, followed by blue and finally black. Falling backward, I returned to the mouths, as Spongebob cannot be Spongebob without his famous two buckteeth. Once again, cut out 70 small white squares, proportioned correctly to the size of the black mouths. Attach them using water, as well.
            Now that the hard tedious part is over and done with, using black decorator’s icing and Wilton decorating tip #3, apply three long black eyelashes to each of Spongebob’s eyes. Continue on to add a half-moon nose to overlap the bottoms of both eyes. Using the same tip but pink icing, draw on two bubbly cheeks and your Spongebobs are complete!

            These cupcakes, while time consuming and tedious, were, overall, easy to make a complete hit at any kid’s birthday party. Whether used as the treats to sing ‘happy birthday’ with or a thank-you-for-coming party favor, these cupcakes’ infectious smiles are sure to be contagious.

Tuesday, February 21, 2012

Cake Decorating That Rocks!

          While cake decorating is a fun and entertaining hobby, it turns into one that it is rewarding when creating a sweet masterpiece for someone you love. This week was the 32nd birthday of my co-worker and one of my best friends, Nick. Nick is an extremely intelligent individual, with a degree in Physics and extensive knowledge when it comes to computer science and technology. He is also currently enrolled back in school to obtain his doctorate. He works vigorously at everything he does and still has one of the kindest and warmest hearts I have ever met. So when his mother, Rosie, came to me with the request for his birthday cake, I was more than happy to make it.
            
One of Nick’s greatest passions is music, having the ability to play multiple instruments, his preferred being the guitar. So I set out to create a music-themed cake, adorned with his favorite flying v guitar and all the works.
 The cake consisted of three layers: Duncan Hines Dark Chocolate Fudge, Classic White, and a marble swirl of the two sandwiched in between. Rather than using a classic vanilla or chocolate frosting, I separated the three layers with a vanilla pudding custard, the recipe of which follows:
1 pkg. instant vanilla pudding
1 c. milk
1/2 c. whipping cream
1 tbsp. honey
1/4 tsp. almond extract
Beat all ingredients together until thickened. Spread between cake layers; frost cake as desired.
            
Then, if you choose, as I did, line the custard with freshly cut strawberries and/or bananas to give the sweet cake a refreshing, fruity kick.


            To cover the cake, I find it most conducive to use fondant to effectively create the decorations that I desire. I prefer to use Duff Fondant, available for purchase at retailers such as Michaels and Party City. Duff offers a wide variety of colors including purple, green, hot pink, blue and black. For this cake, I used the plain white fondant, coloring it myself with Wilton food dye.
            
Decorating with fondant requires some basic skills in drawing and art. If you do not feel confident in your drawing ability, print out pictures of what you wish to convey on the cake and cut them into stencils. Use a toothpick to trace the shapes in the fondant and proceed to cut them out using a fondant cutter or a sharp, thin knife.
           
When applying the different shapes, such as the guitar and the wording, I simply ran my finger under tap water and applied it lightly to the backs of the shapes, allowing them to adhere to the cake’s covering. To achieve the checkerboard side effect, use a small square cookie or fondant cutter to create multiple squares. Turn sideways into a diamond and stretch to a large size (if necessary). Simply place on the edges of the cake so that the tips of the diamonds touch and continue until the effect surrounds the cake.
            
Finally, if you do not have an icing bag or gun available, fill a plastic ziplock or storage bag with the colored icing of your choice and cut a small tip from the corner. Use icing star tip number 21 to create a border for the top and bottom of the cake.

And voila, you have a beautiful music cake that is simple and easy to make! Rosie ordered this cake as a surprise to Nick and it truly warmed my heart to see his smile when she gave it to him. I love knowing that something I made can make someone I love so happy and grateful. This cake only took three hours to decorate and I had a blast making it. I hope you will too when making your own rockin' birthday cake.
            

Tuesday, February 14, 2012

Valentine’s Day: Not Your Everyday Dozen Roses…


Every year, it's the same old thing; a bouquet of roses, the teddy bear with the little red bowtie, and the assorted chocolates encased in the heart-shaped box, wrapped in cellophane. Valentine's Day is supposed to be a holiday that celebrates the love between two people and the admiration and gratitude felt in the relationship. However, these trivial tokens hardly express the feelings of care and love. The flowers will wilt, the teddy will lose his charm and, let's face it, the chocolates will go straight to your thighs. This February 14th, why not make the effort to show that special person in your life that you love them by thinking outside the heart-shaped box?
It’s often said that the best gifts are not bought, but are homemade. Ladies, why not satisfy your man’s sweet tooth by whipping up a batch of clever, yet delicious cupcakes that are sure to make him drool? Guys, show your girl you’re willing to put in the effort and take the time to create a dozen of these fun, playful rose cupcakes, the perfect replacement for that played-out bouquet that will inevitably end up in the trash a week later.

Rose Cupcakes (yields 24):
What You’ll Need:
1 box Betty Crocker ® SuperMoist ® 1 container Betty Crocker ® Whipped
   devil’s food cake mix     vanilla frosting
1 ¼ cups water 12 rolls of Fruit by the Foot fruit leather
1/3 cup vegetable oil    in Cherry Rage or strawberry flavor
3 eggs 2 rolls of Fruit by the Foot fruit leather
1 pair of scissors    in Color by the Foot flavor

What You’ll Do:
  1. Frost 12 mini cupcakes with white icing.
  2. To make a rose, unroll a piece of the cherry or strawberry fruit leather and divide it in half along the wavy perforated middle line. Take one of the halves and roll up about 5 inches to form the flower's center. Set the rolled strip wavy side up in the middle of a cupcake, as shown, and continue to loosely wrap the remaining fruit leather around the center at a slight angle until the flower is completed.
  3. Repeat this process for the remaining flowers. (You should be able to get 2 mini roses out of each roll of fruit leather.)
  4. Cut leaf shapes from the wavy edge of the Color by the Foot strip as shown, then tuck the leaves under the roses.

These cupcakes are sure to make you fall in love! Enjoy!